Incoming Webhook
Today, we're diving into incoming webhooks, a powerful feature that allows external systems to send data directly into Expedify. We'll explore how to set up these webhooks, enabling seamless data integration from platforms like Stripe, Typeform, and Odoo, ultimately automating your workflows.
Incoming Webhook Setup
This lesson provides a comprehensive overview of incoming webhooks, divided into two key parts. First, we'll cover the setup process: creating the webhook within Expedify's settings, copying the secure URL, and understanding the various methods external systems use to send data. The second half focuses on the workflow integration, demonstrating how to configure a Webhook Trigger to receive this data and process it, for example, by creating new contacts in your CRM. This end-to-end guide covers every aspect of the incoming webhook story.
Where Webhooks Live: Settings, Webhooks, Incoming
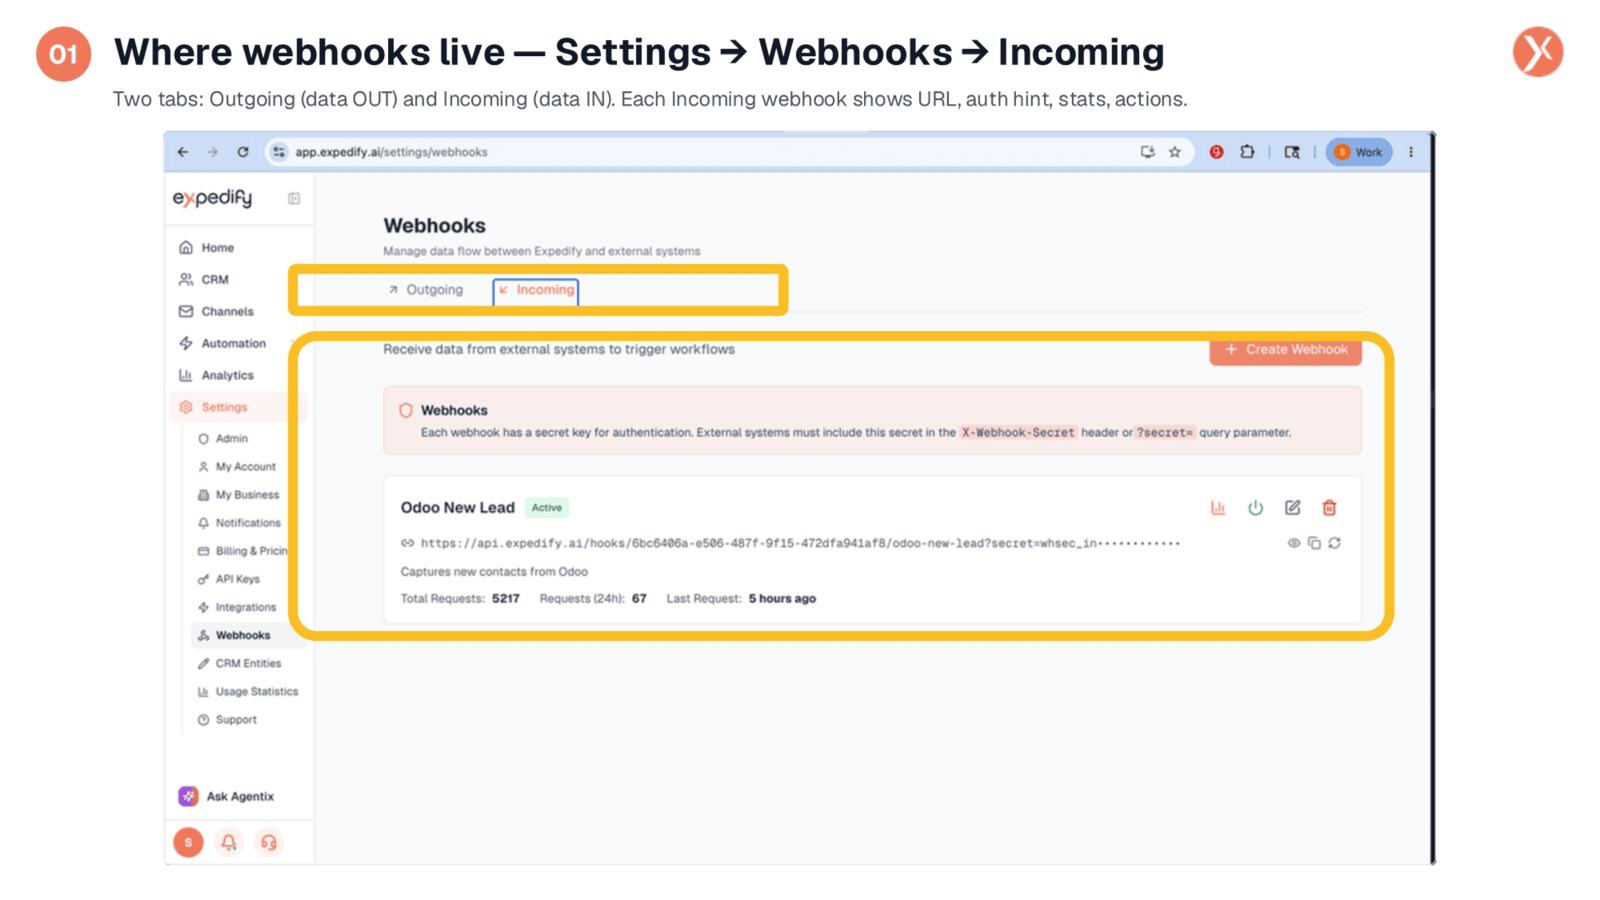
To manage your webhooks, navigate to Settings, then Webhooks, and select the Incoming tab. Here, you'll find a clear overview of your incoming webhooks, distinct from the outgoing ones we'll cover later. Each webhook is secured with a secret, which external systems use for authentication, either in the X-Webhook-Secret header or as a query parameter. You can see existing webhooks, like the "Odoo New Lead" example, along with their URLs, authentication hints, and request statistics, including total requests and activity over the last 24 hours.
Hit + Create Webhook
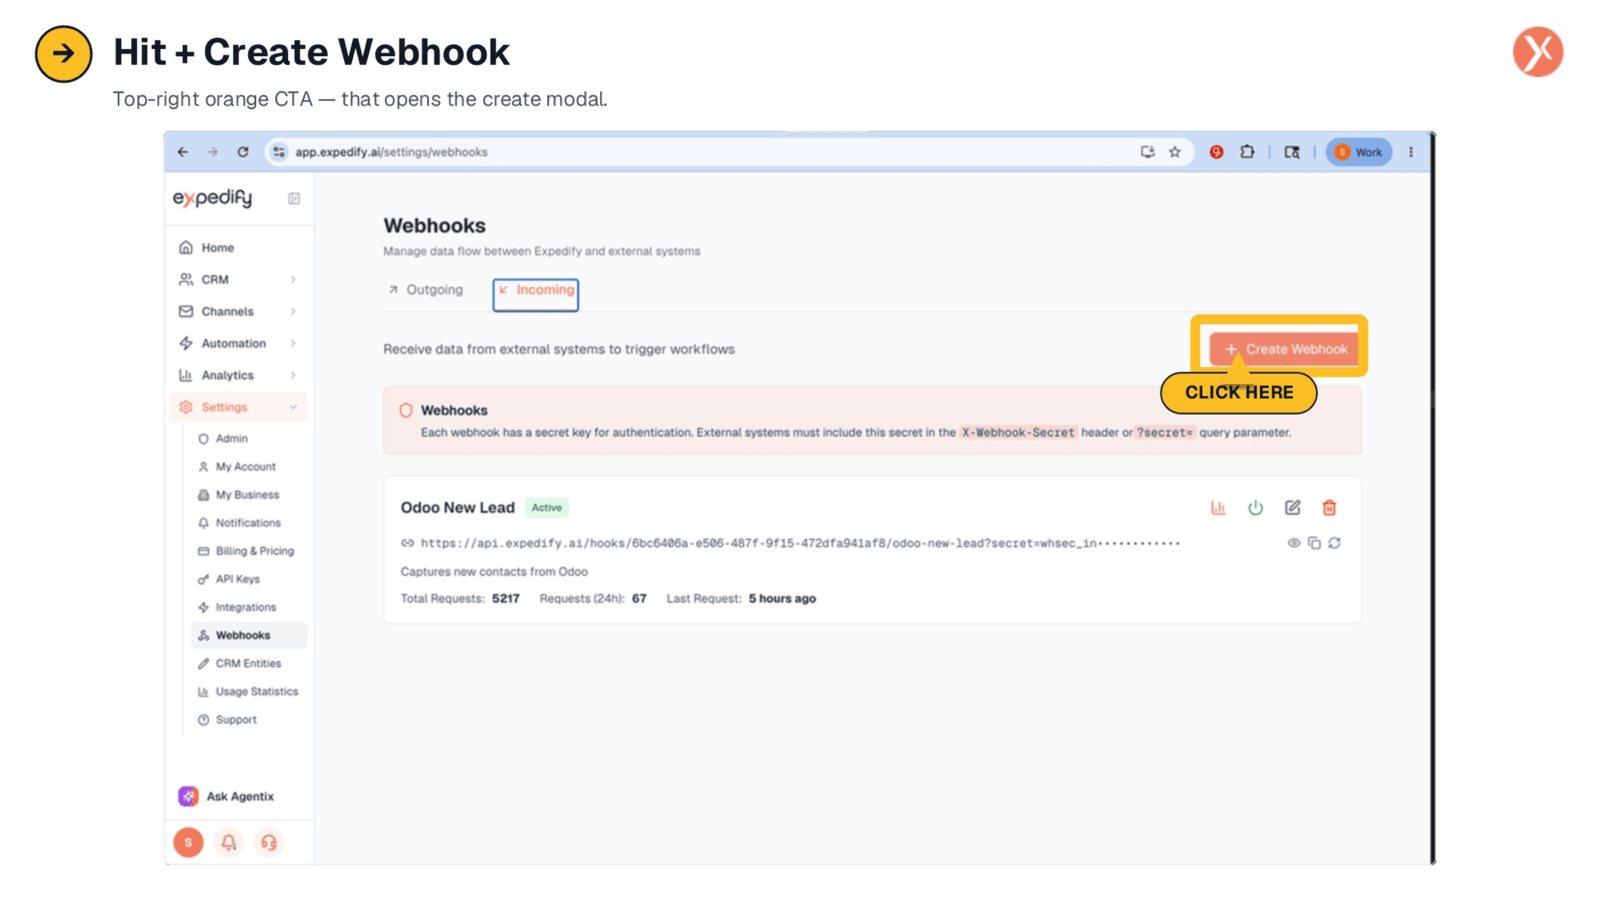
To begin setting up a new incoming webhook, simply locate and click the "Create Webhook" button. This prominent orange call-to-action is positioned in the top-right corner of the Webhooks interface. Clicking it will open a modal window, allowing you to define the specifics of your new webhook and integrate it into your Expedify environment.
Three Fields: That's All It Takes
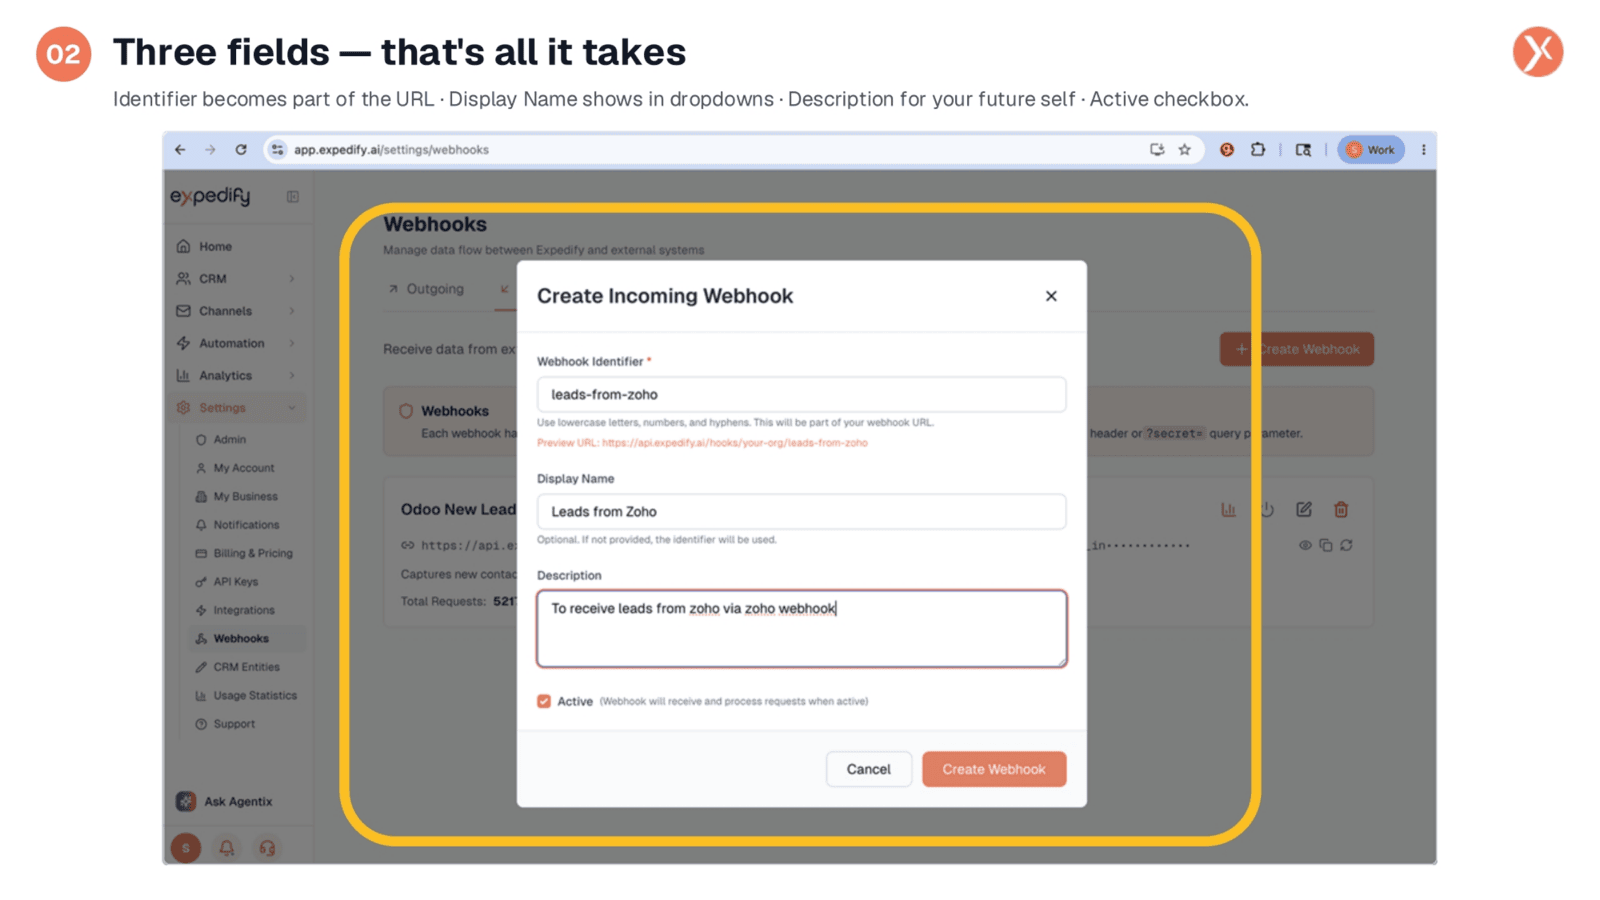
When creating an incoming webhook, you'll primarily focus on three key fields. The "Webhook Identifier" forms part of the URL, requiring lowercase letters, numbers, and hyphens for clarity. The "Display Name" provides a user-friendly label for your team to identify the webhook in dropdowns, while the "Description" serves as a helpful reminder of its purpose for future reference. Ensure the "Active" checkbox remains selected, then click "Create" to generate your unique webhook URL and its associated secret.
Copy the URL: Secret Already Attached
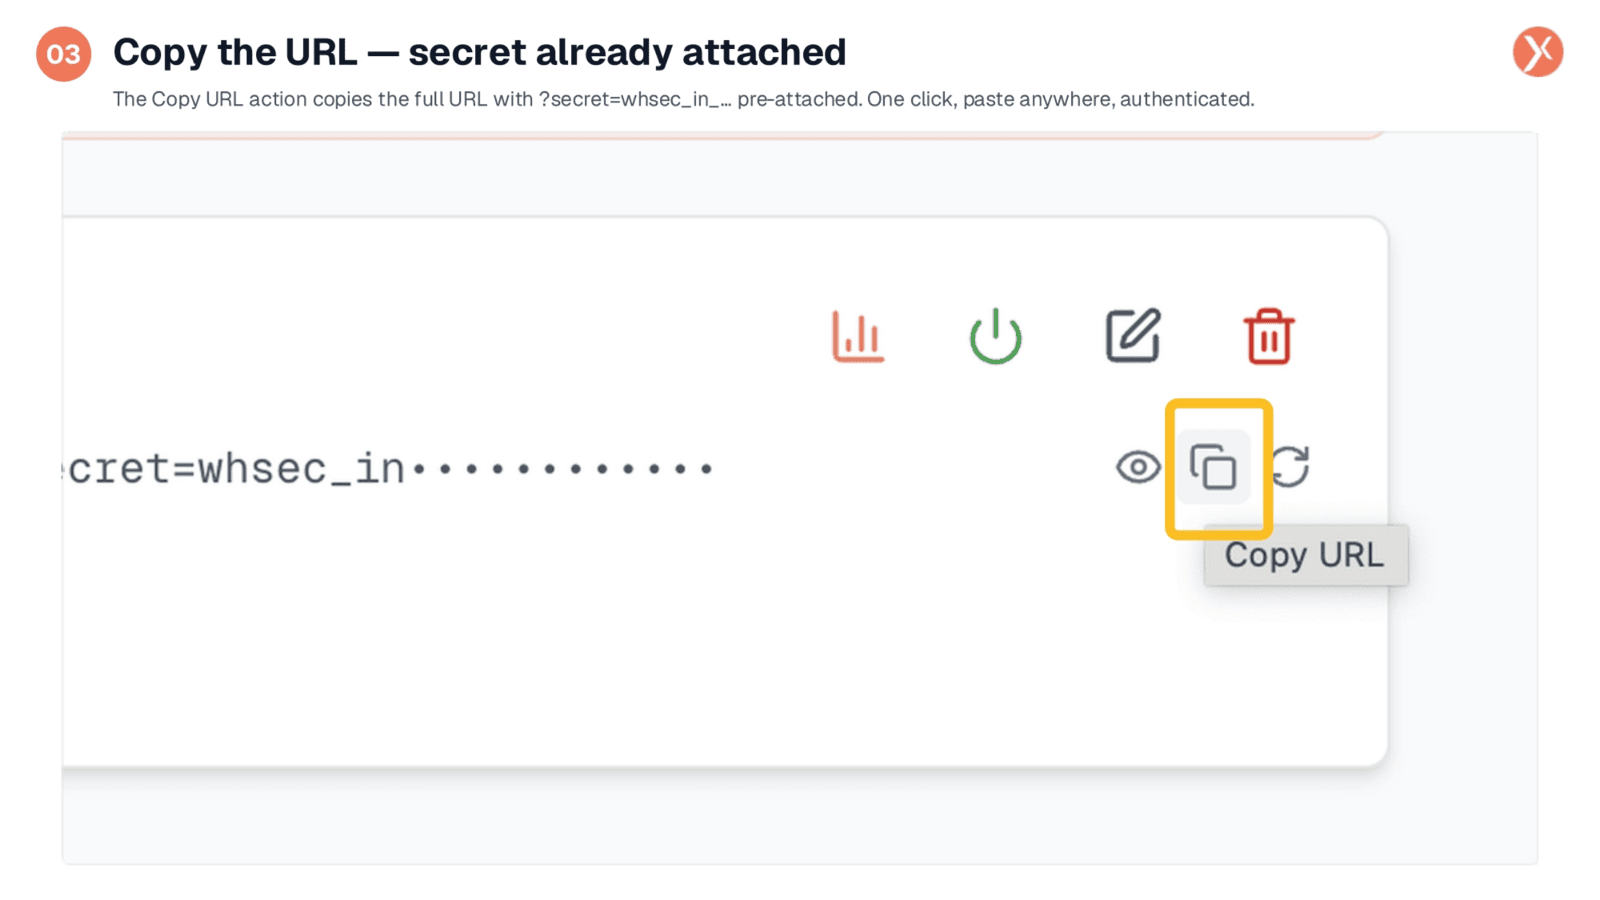
After creating your webhook, the most crucial step is to copy its URL. The copy icon, though small, performs a vital function: it copies the complete URL with the authentication secret already appended as a query parameter. This ensures that when you paste it into external systems like Stripe or Typeform, or use it in your custom code, authentication is automatically handled. For situations requiring the raw secret, such as for an HTTP header, the eye icon allows you to reveal it. Always copy the URL directly from the UI to avoid errors.
Three Ways to Send the Secret
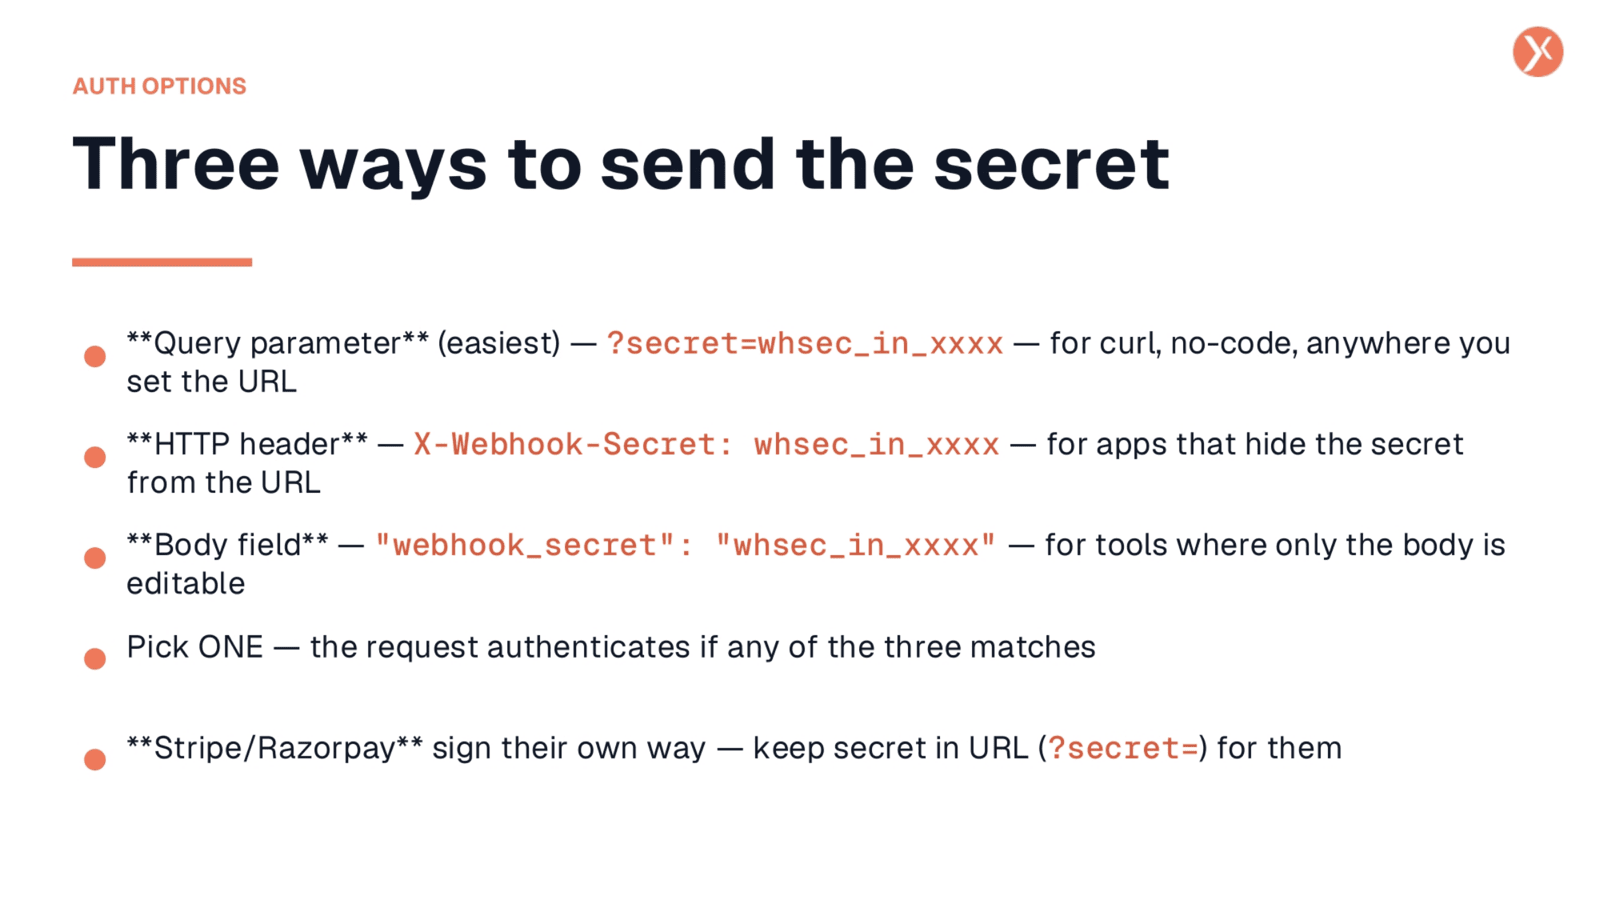
Every incoming webhook is secured with a unique secret, typically starting with "whsec_in_". You have three primary methods to send this secret, depending on the capabilities of your sending tool. The easiest is as a query parameter, which is automatically included when you copy the URL. Alternatively, for a cleaner approach, you can send it as an HTTP header using "X-Webhook-Secret". The third option is to embed "webhook_secret" directly within the request body. Only one of these methods is required for successful authentication. Note that for services like Stripe and Razorpay, it's best to keep the secret in the URL for proper authentication.
Where the Data Comes From
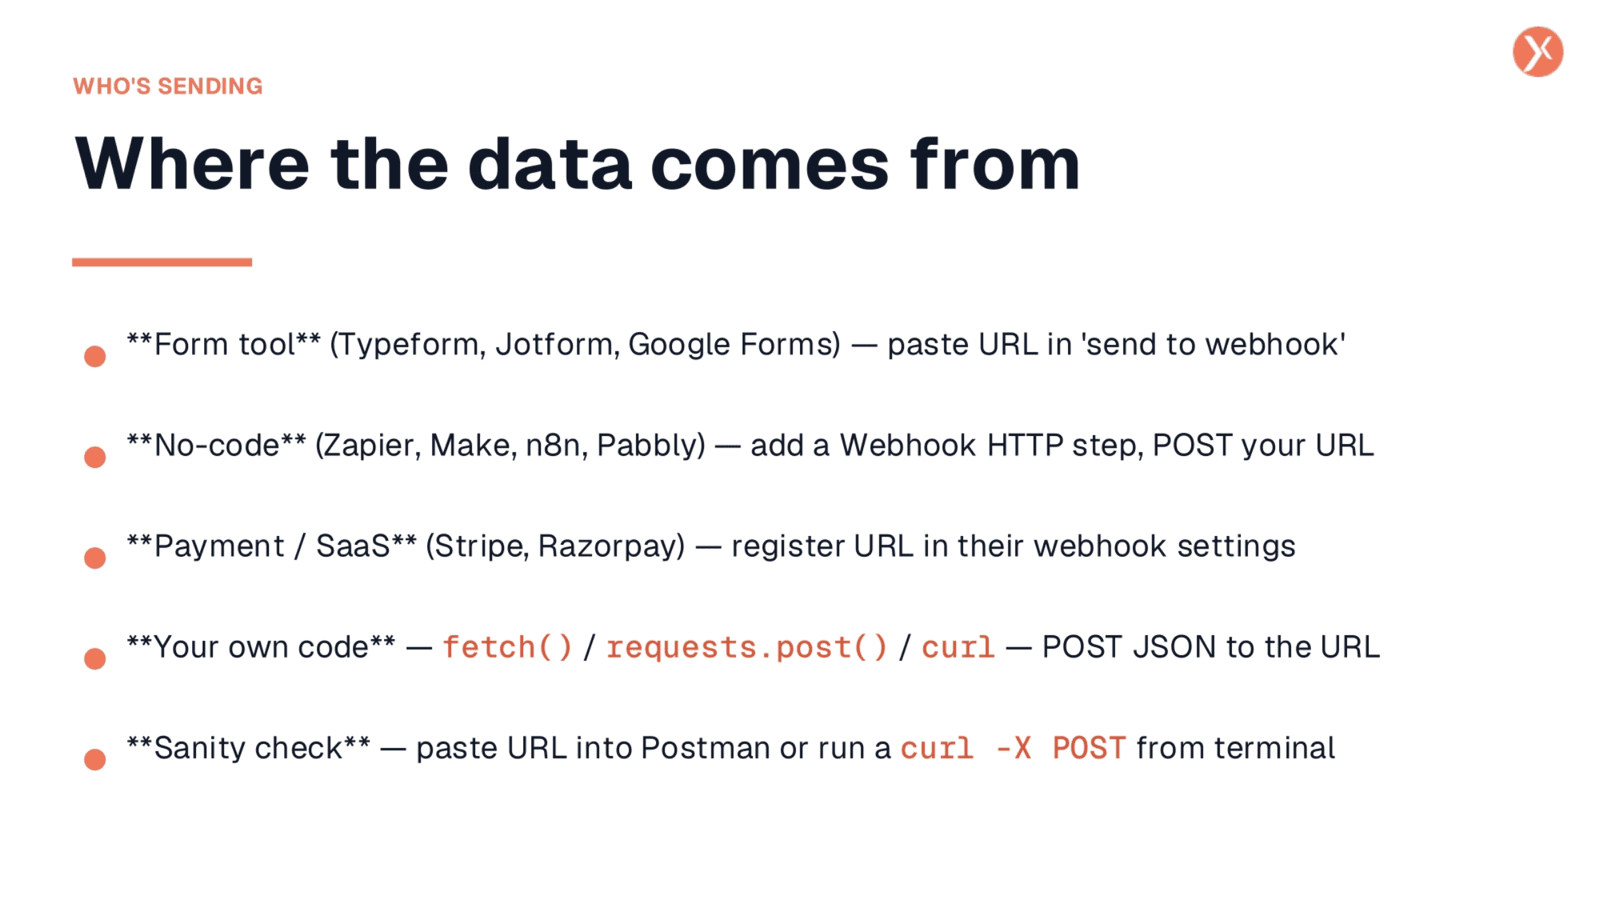
Incoming webhook data can originate from a wide array of sources. Form tools like Typeform, Jotform, and Google Forms allow you to paste your webhook URL directly into their "send to webhook" settings. No-code platforms such as Zapier, Make, and n8n enable you to add a Webhook HTTP step configured for POST requests. Payment providers like Stripe and Razorpay offer dashboards where you can register your webhook URL. For custom solutions, your own code, whether using JavaScript fetch, Python requests, or PHP cURL, can POST JSON data to the URL. A quick sanity check can be performed by pasting the URL into Postman or running a curl command from your terminal.
Two Nodes: Webhook In, CRM Record Out
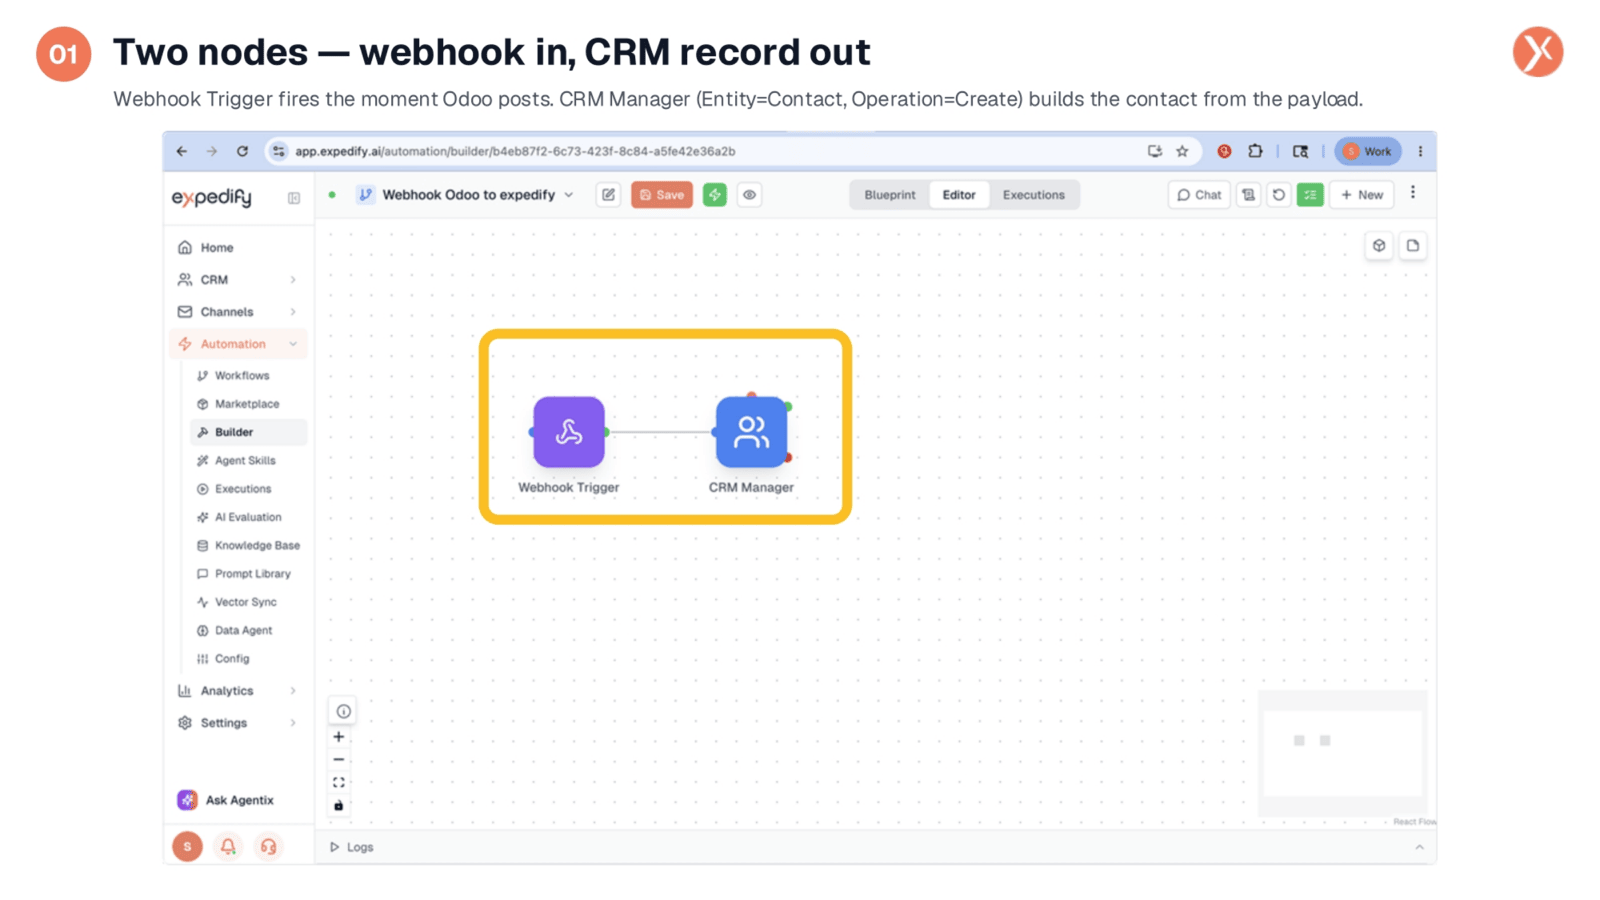
Once your webhook is registered and ready to receive data, Expedify processes this incoming information through a workflow. This example workflow illustrates a common scenario with two nodes: a Webhook Trigger on the left and a CRM Manager on the right. The Webhook Trigger actively listens for HTTP requests sent to your webhook. Upon receiving data, the CRM Manager then utilizes this payload to perform an action, such as creating a new contact. This specific workflow, aptly named "Webhook Odoo to Expedify," demonstrates how data from Odoo can automatically generate CRM records within Expedify.
Double-click the Webhook Trigger
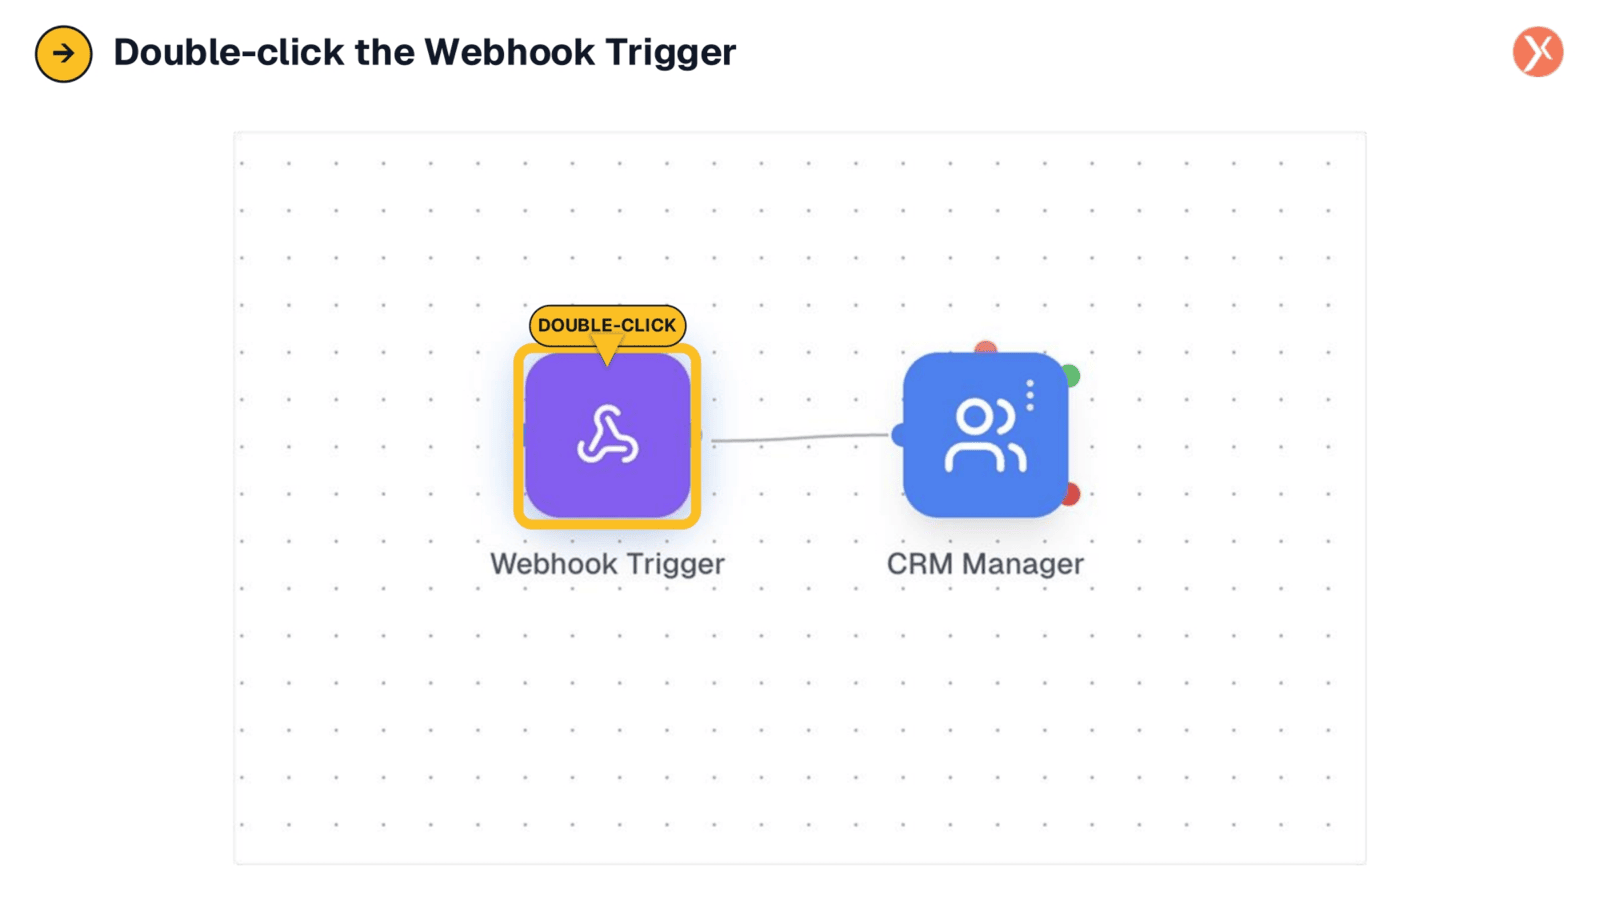
To configure the Webhook Trigger node within your workflow, simply double-click it. This action will open the trigger's settings panel, allowing you to specify which incoming webhook this particular workflow should listen to. This is a crucial step in ensuring your workflow correctly processes the data sent from external systems.
Inside the Trigger: Just Pick a Webhook
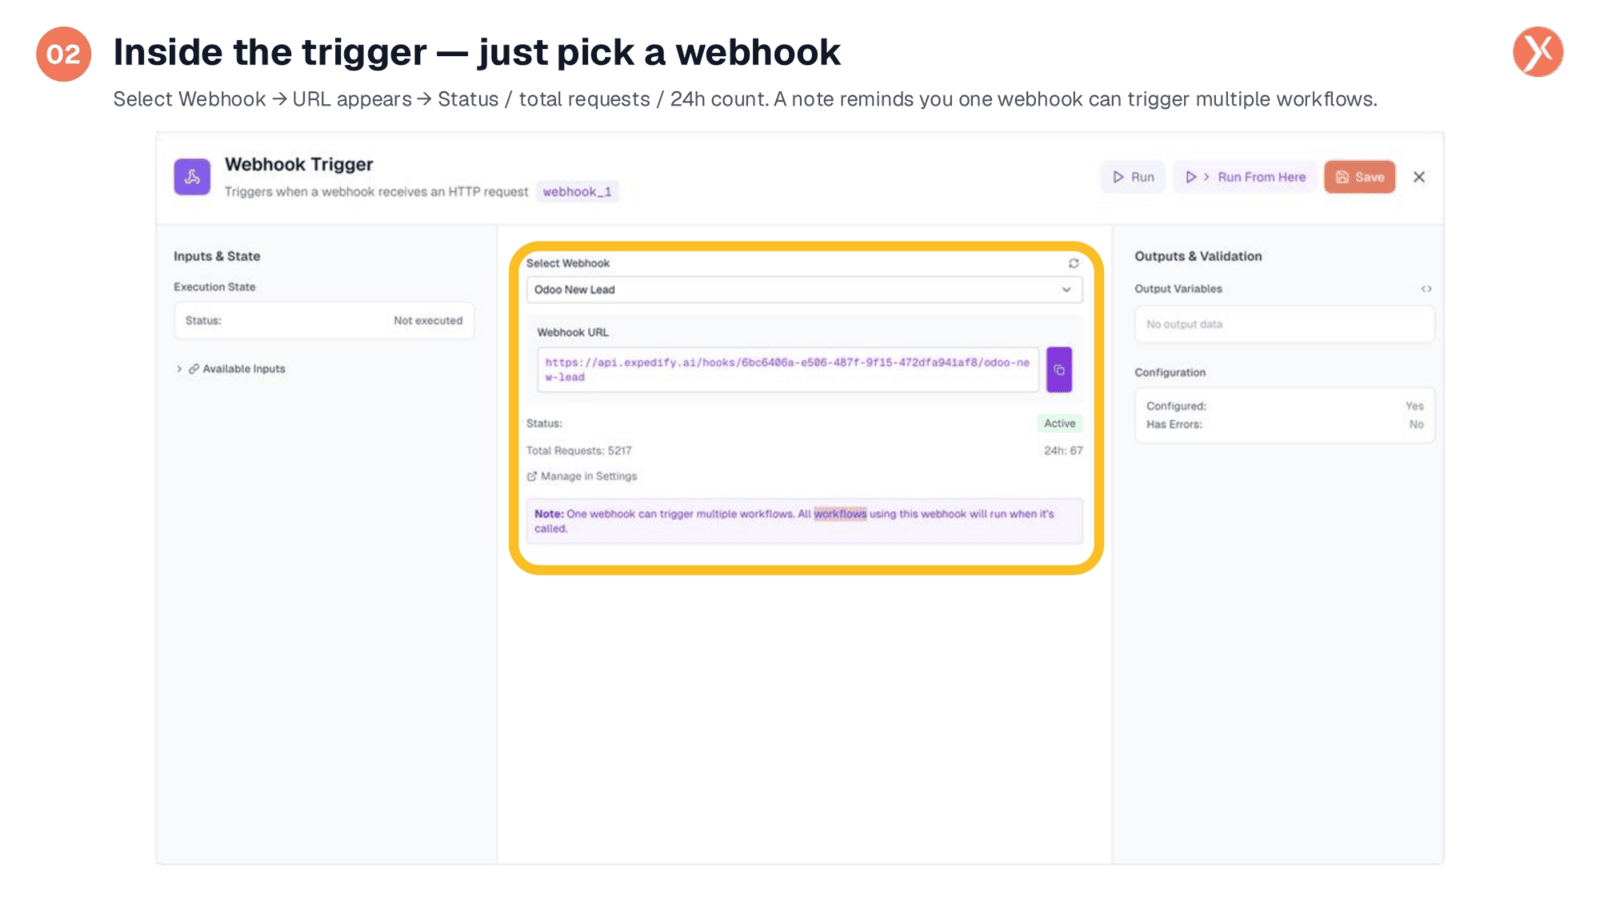
Configuring the Webhook Trigger is straightforward, primarily involving selecting the specific webhook this workflow will monitor. Once chosen, the webhook's URL, its current status, total request count, and recent activity over the last 24 hours will be displayed. An important feature to note is that a single incoming webhook can activate multiple workflows. This means the same incoming request can fan out, triggering every workflow configured to listen to that particular webhook, allowing for versatile automation, such as creating a CRM lead and simultaneously sending a Slack alert.
Click the Select Webhook Dropdown
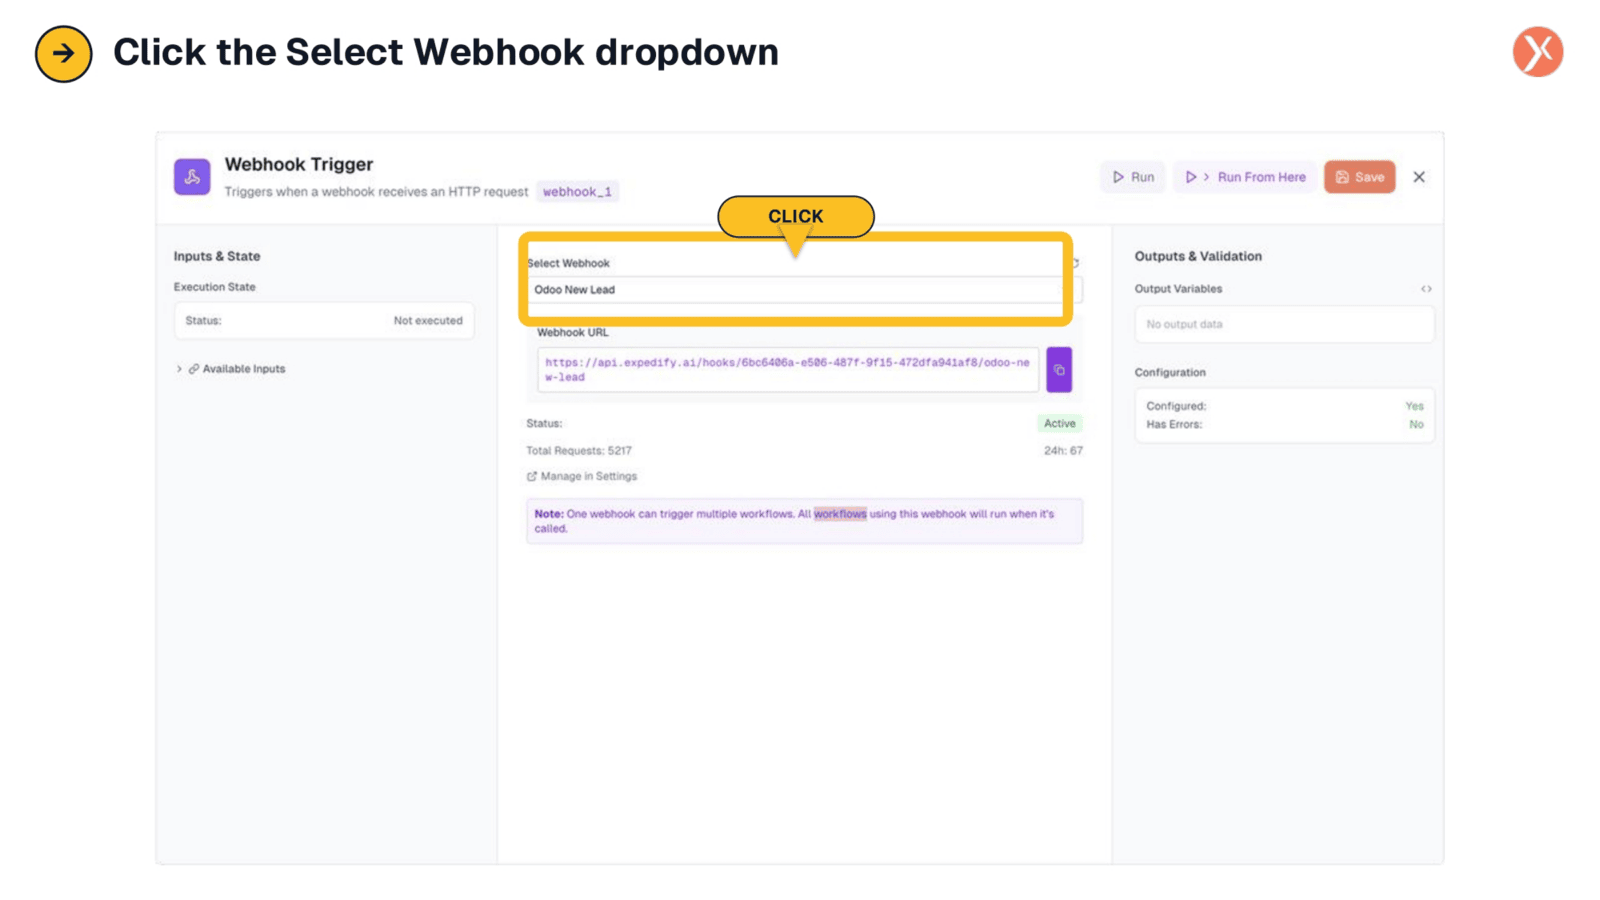
To link your workflow to an existing incoming webhook, click the "Select Webhook" dropdown menu. This action will reveal a list of all the webhooks you have previously created and configured within Expedify's settings.
Every Incoming Webhook You've Created Shows Up Here
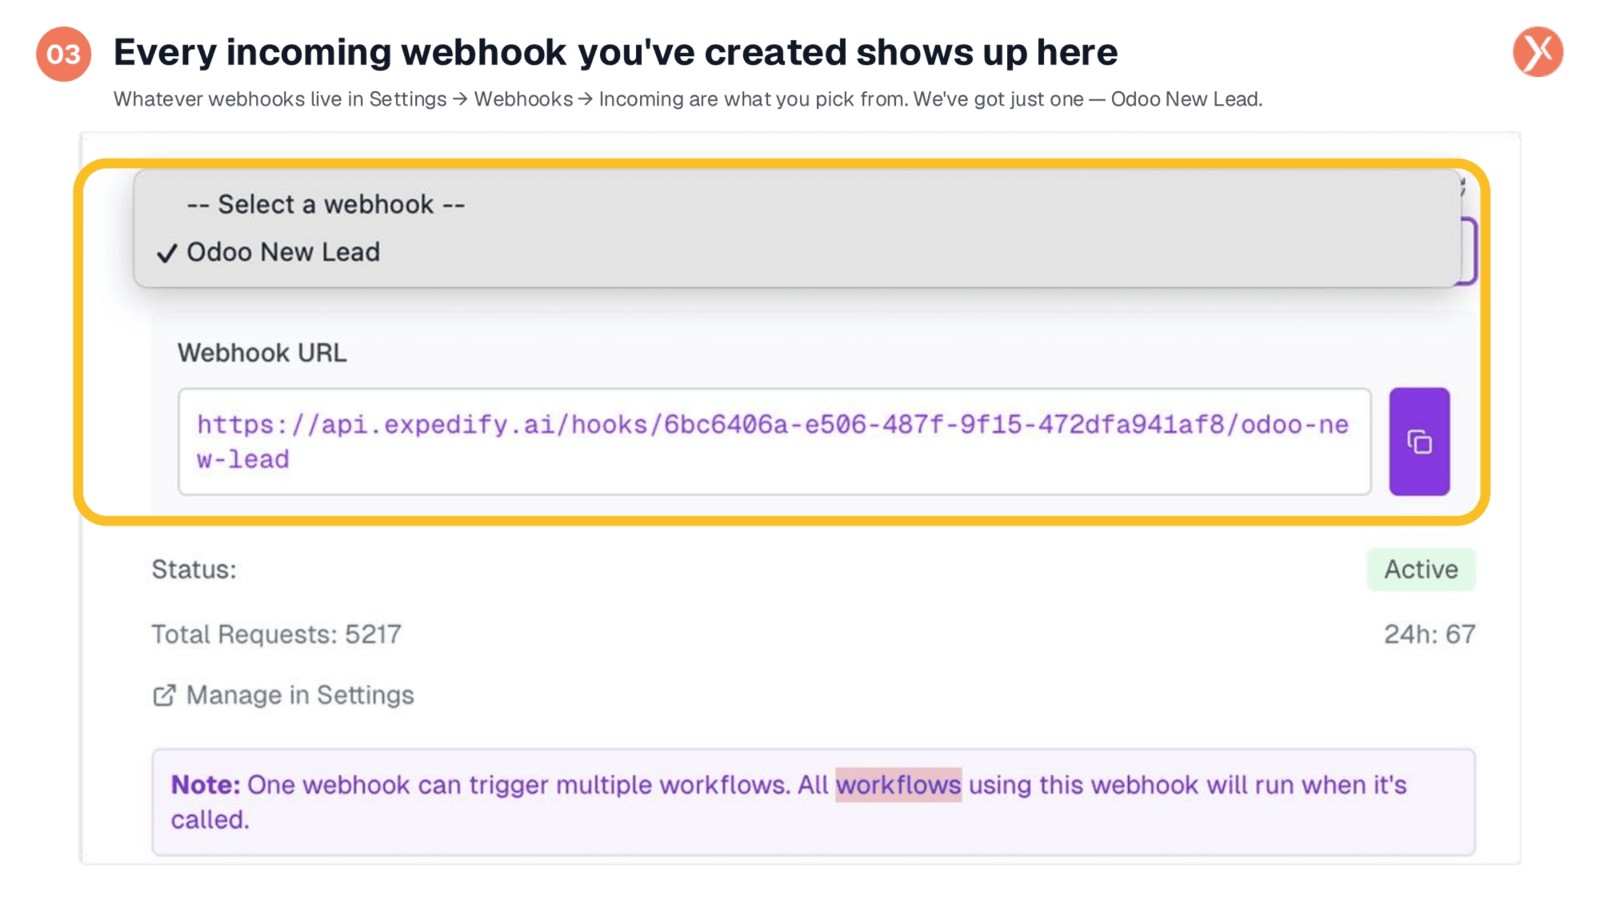
The "Select a webhook" dropdown displays every incoming webhook you've established in Expedify. This centralized list allows you to easily choose which webhook your current workflow should listen to. For instance, if you've created an "Odoo New Lead" webhook, it will appear here, ready to be selected. If you had multiple webhooks configured, they would all be available for selection, enabling you to precisely control which incoming data triggers this specific workflow.
The Payload Flows Into Your Workflow as Variables
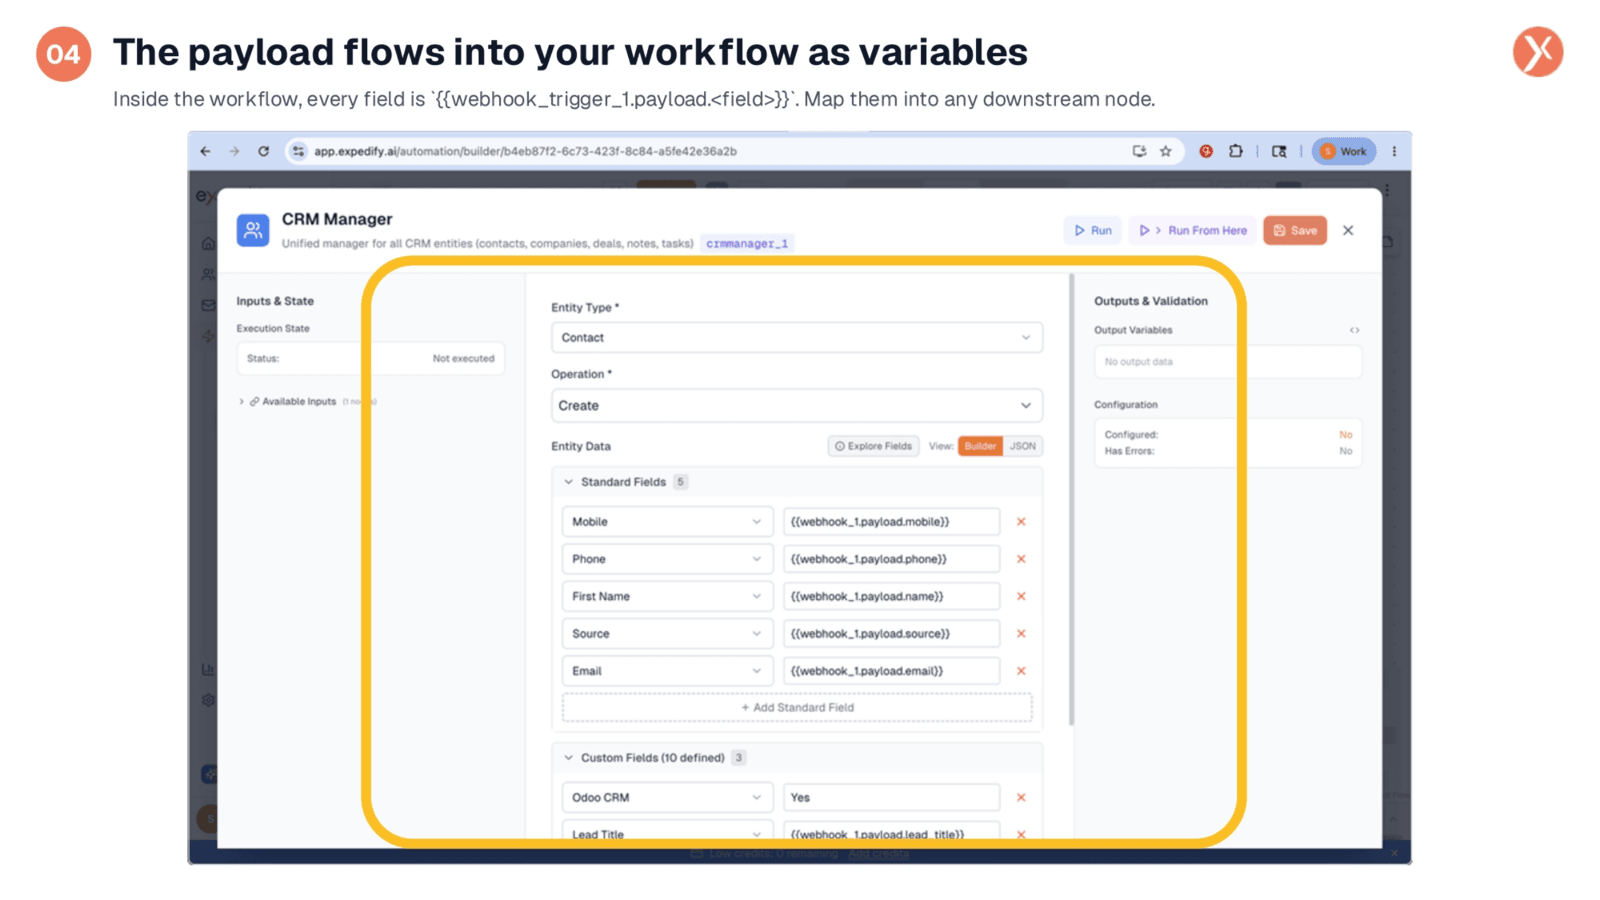
Once data arrives via the webhook, it becomes accessible within your workflow as variables. Each field from the incoming JSON payload can be referenced using a clear syntax, such as webhook_trigger_1.payload.email or webhook_trigger_1.payload.first_name. In this example, the CRM Manager node is configured to create a new contact, with its fields directly mapped to corresponding keys from the payload. This allows for seamless integration, where any JSON data sent by an external system can be used to populate fields in downstream nodes. After saving and activating the workflow, every subsequent webhook hit will automatically create a CRM record.
The Result: Your CRM Filling Up Automatically
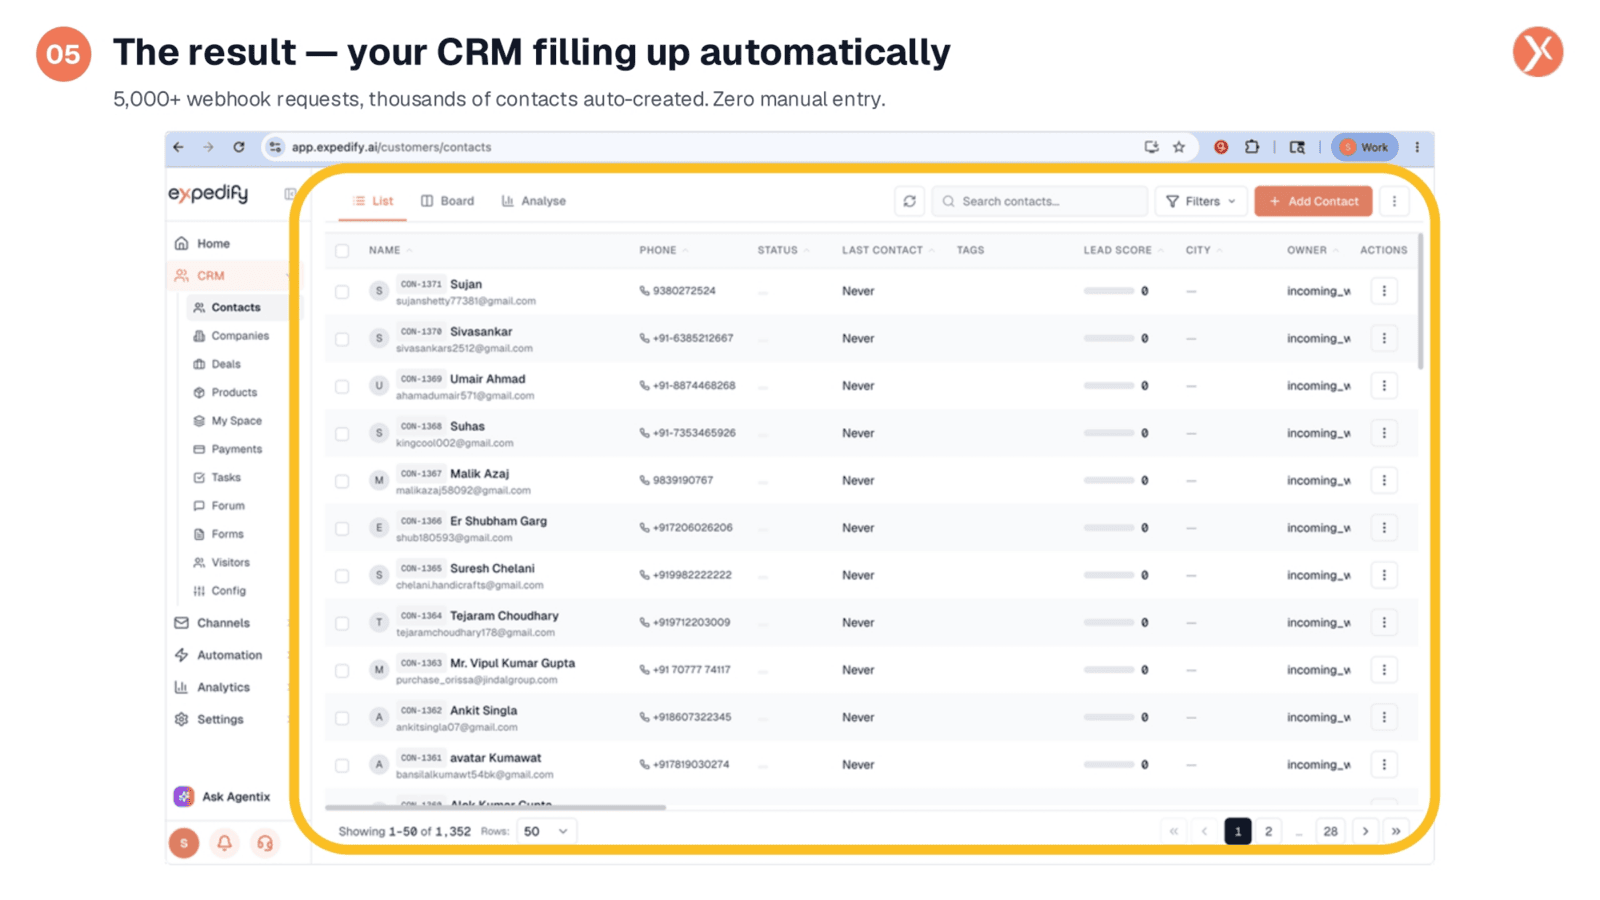
This view demonstrates the powerful outcome of an automated incoming webhook setup. The CRM Contacts list is populated with thousands of records, all generated automatically from the Odoo webhook. Each entry, including name, phone, and email, was created without any manual intervention. The "Owner" column even indicates these contacts were workflow-created, distinguishing them from manually entered data. With over five thousand webhook hits, this system exemplifies the core benefit of incoming webhooks: a single URL and secret enable continuous, automatic data flow, eliminating manual entry and saving significant time.
Common Failure Modes
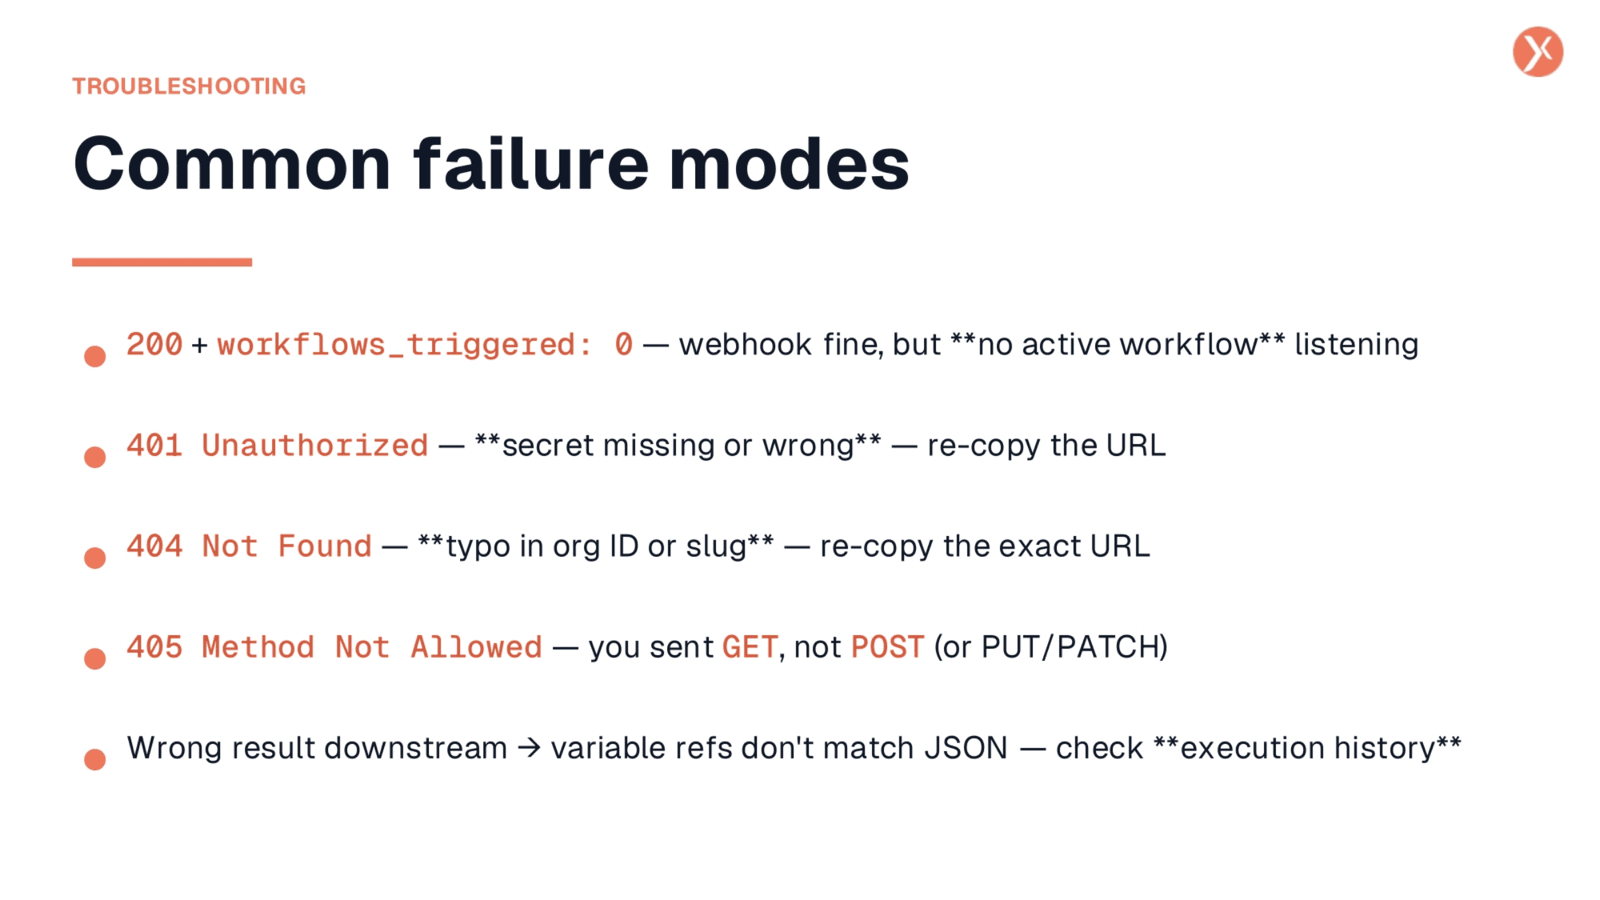
When working with webhooks, you might encounter a few common failure modes. A "200 OK" response with zero workflows triggered indicates the webhook received the request, but no active workflow is configured to listen. A "401 Unauthorized" error points to an incorrect or missing secret, requiring you to re-copy the URL. A "404 Not Found" suggests a typo in the URL itself. If you receive a "405 Method Not Allowed," ensure you're sending a POST request, not GET. Finally, if the webhook returns "200 OK" but the workflow behaves unexpectedly, check the execution history to verify that your variable references within the workflow correctly match the incoming JSON payload. Delivery logs are available in Settings under your webhook.
Incoming Webhooks Recap
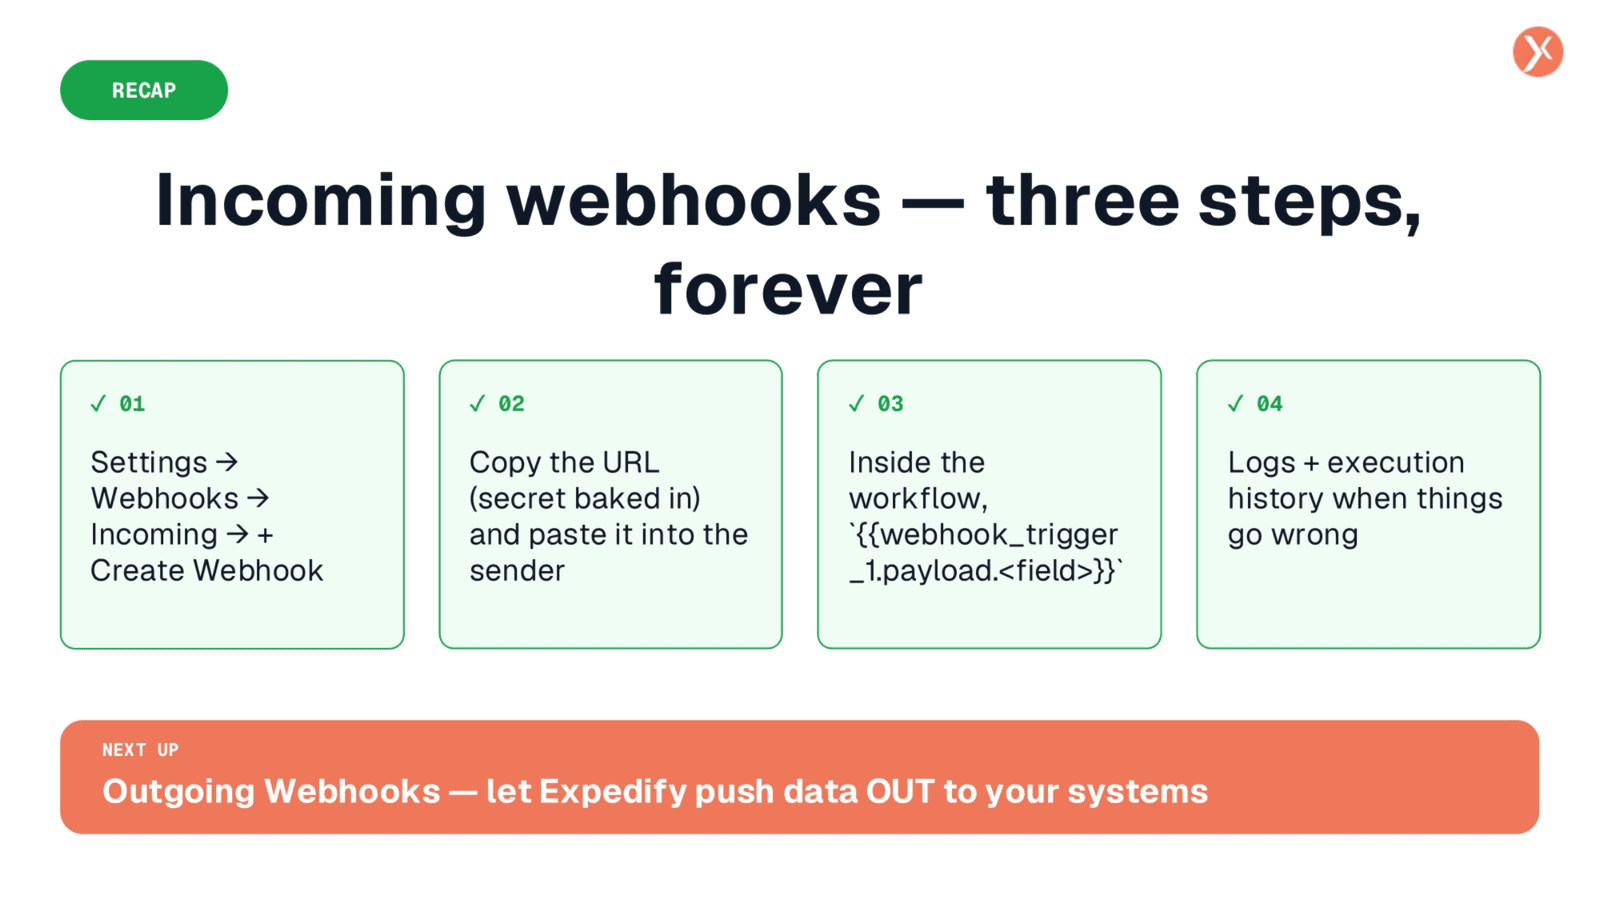
Let's quickly recap the key steps for incoming webhooks.
Send Your First Request — With Curl
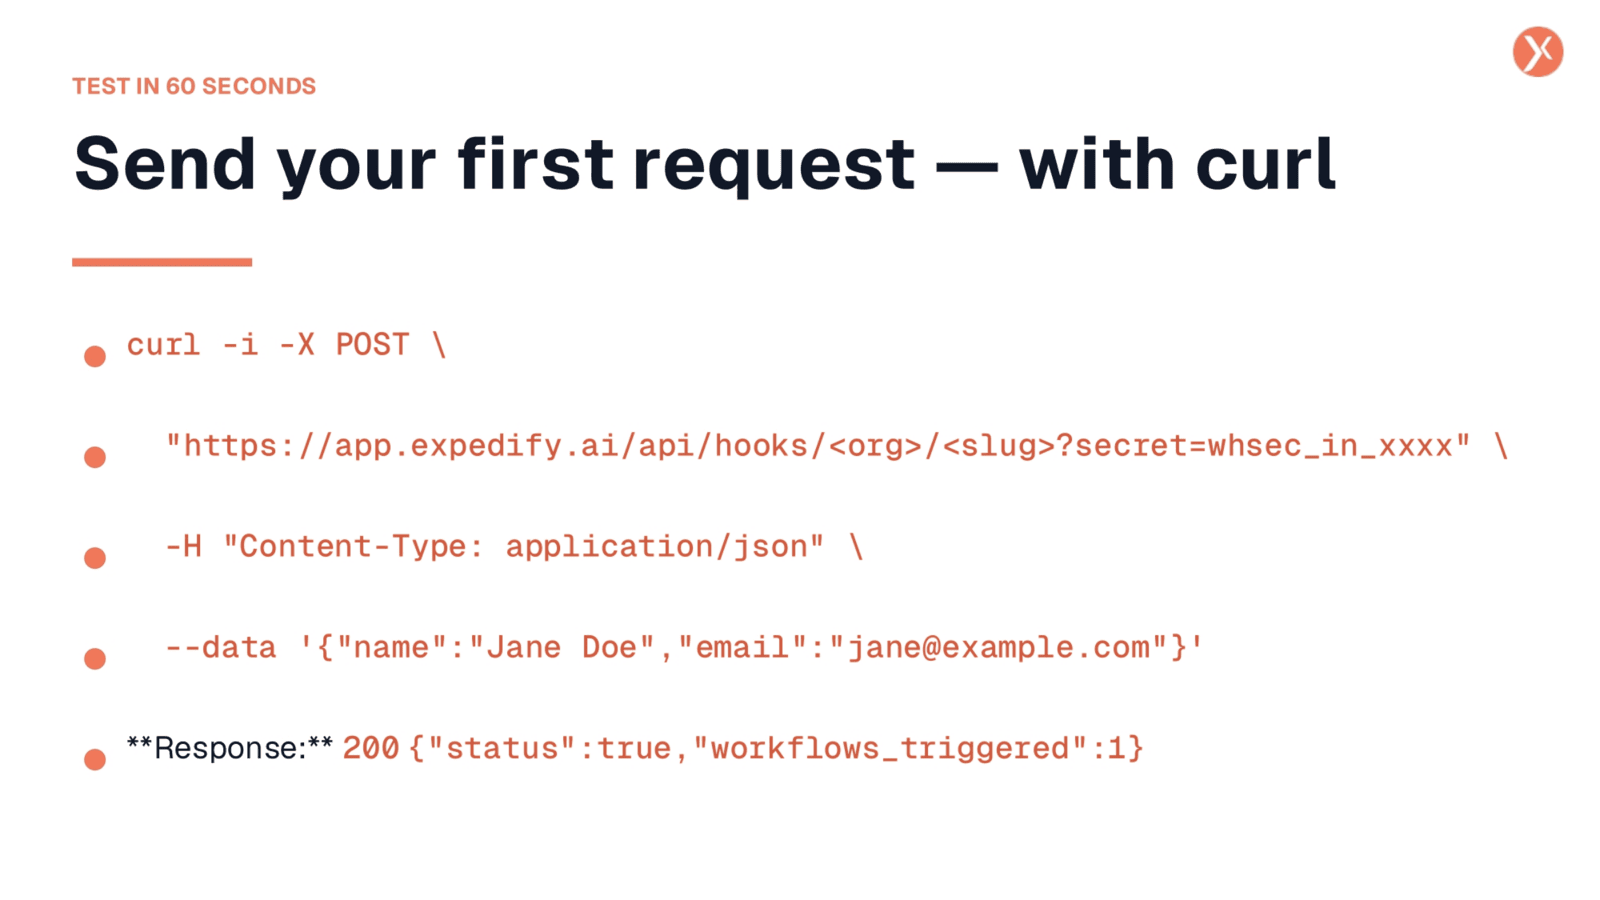
Before integrating with any external system, it's crucial to verify your webhook's functionality using a curl command. Replace the placeholders with your actual webhook URL, obtained from the copy button, and populate the request body with your desired JSON data. A successful request will return a "200" status with "status:true" and a count of triggered workflows. If "workflows_triggered" is zero, the webhook is active but not yet linked to a workflow. Errors like "401," "404," or "405" indicate issues with the secret, URL, or HTTP method, respectively. This quick test ensures your webhook is solid before proceeding with workflow configuration.